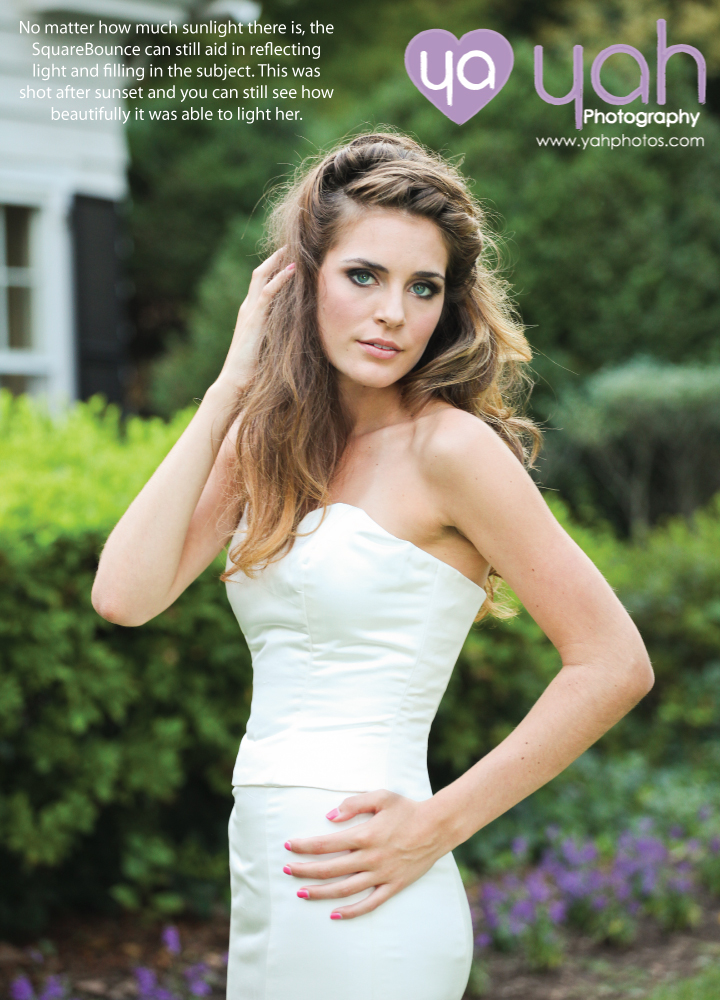
For those of you who know me, or have had a session with me, I LOVE to shoot into the sun! With that comes amazing and stunning pictures like the one you see above, and ones I shoot all the time. One of my friends even said that it's the yah "trademark shot"... but with that comes knowing what light to use and how to compete with the sun to get just the right exposure.Most of the time this requires some off camera light source, I use either my White Lightening X1600 or my Canon 580 EX. Over the course of my 365 project last year I had a great time playing around with those and creating alot of great lighting situations and eventually I will do a comparision post showing which I use at what time. But the main point of telling you this is because I rarely used a reflector! And the sad reason was because I could never fold the darn thing back up and would be so embaressed trying to do it in front of my clients. They would eventually try to help me, and by the end of it we were both frustrated and I would just bend it to fit in the trunk of my Mini Cooper until I could get it home and shove it in the closet.So after finally having it with the thing this May, after one of my Senior photo shoots; my husband was on a mission to find us a new reflector! He stumbled upon the SquareBounce and said Kelli, even you could use this one! I was SOLD! It arrived the day of the Couture Bridal photo shoot (that some of you may have seen the pictures from and I posted one below) and I whipped it out to test it and was immediately in love!It was so easy to open, to hold while shooting, and due to the handle it can stand open on its own. I continued to use it for the next couple sessions and finally had my husband tag along on a couple shoots so he could get it in action because I thought it was that awesome! And now comes the fun part... seeing the images that I captured using the SquareBounce! Enjoy and scroll to the bottom to see the pros & cons and where to get one for yourself! It is truly worth the investment!
To summarize, here are the Pros and Cons:Pros - Easy to open and close (see the video below), stands on it's own, light enough to hold while shooting or have someone else hold it for you, compact, comes with a carrying case, offers two reflecting surfaces a silver and white for different lighting situations, and the last but not least it is super EASY to fold and put away! Because of this I cannot wait to take my reflector with me to every single shoot, whereas in the past I would leave it at home on "accident" because I couldn't stand dealing with it! Cons - Depending on the angle of the sun the stand alone feature does not work because it reflects it at the wrong angle (the fix, just hold or have someone else hold it), sometimes the silver reflects too much in which case you can just switch to the white one, and lastly if shooting in windy conditions the SquareBounce will tip over (the fix, I bring a little weight with me and stick it on the handle which is the same thing you would do for any lighting equipment on a stand that may tip over)Overall this product is amazing and I will be recommending it to everyone! I want everyone to know that there is an alternative to struggling for hours trying to close other types of reflectors. So stop embarrassing yourself and got buy yourself a better reflector!!To purchase your own Nori SquareBounce check out their website, and become a fan on Facebook!
The Story: As you can probably tell by now, every one of my reviews start with a story on how I came to find the certain product I am reviewing. This one started in New Orleans this past January. As you know I was there at Imaging USA which is a massive photography conference. One of the main highlights is the expo, with tons of vendors and goodies that photographers go nuts over. While browsing, I happened upon DaisyGrip and thought that it was the neatest thing I had seen there. After meeting Christine and her husband David, I explained to them what I was doing with my blog and how I wanted to review products that not everyone had heard of and help shine some light on how neat they are! Hence, my new relationship with the DaisyGrip! =)
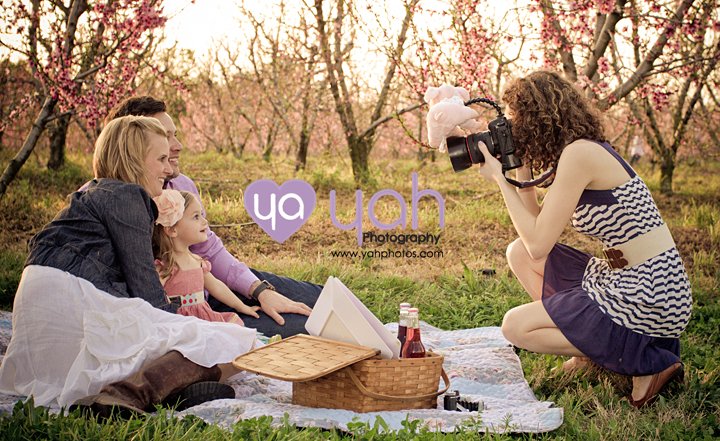
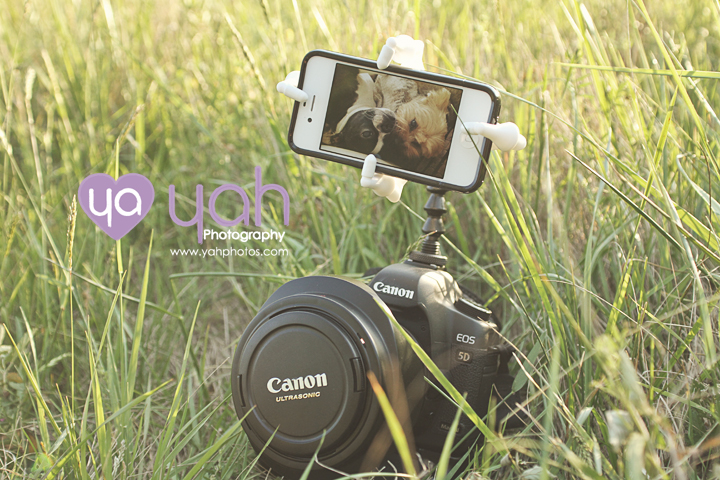
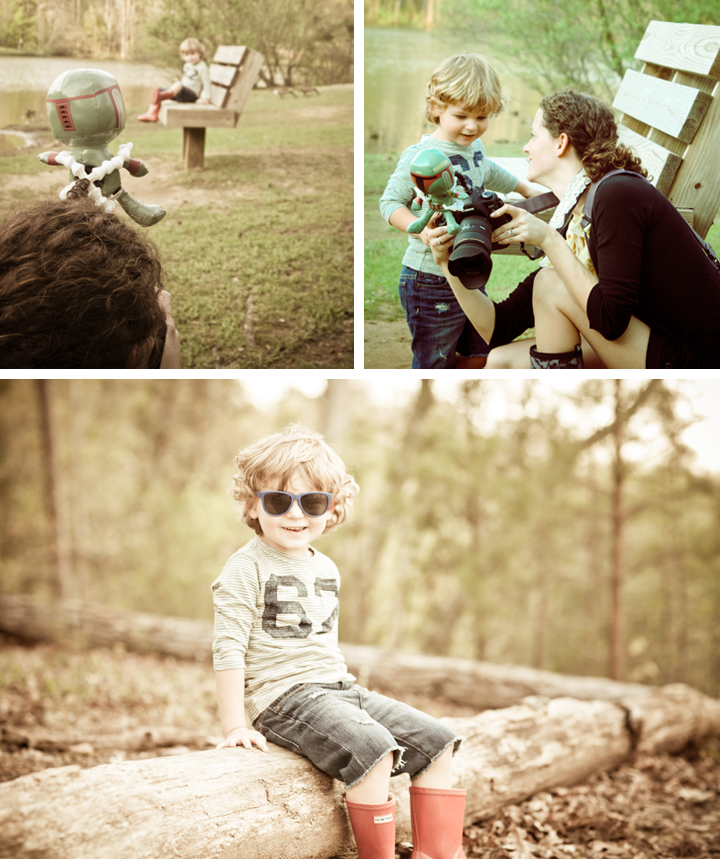
After using it for a couple family sessions (with small children), I can see what a great tool it truly is to have in my gear bag. It attaches really easy right into the camera's hot shoe and is made of great quality material so you know it's not going anywhere and neither is whatever you put in it. It is even able to hold your iPhone. (This would have come in real handy for a photo-shoot I had at Christmas where I was trying to get three children and a newborn to pay attention to me. Finally in desperation my husband pulled out his iPhone and all of them looked in amazement. Here is the link to the past blog entry to see what I am talking about).
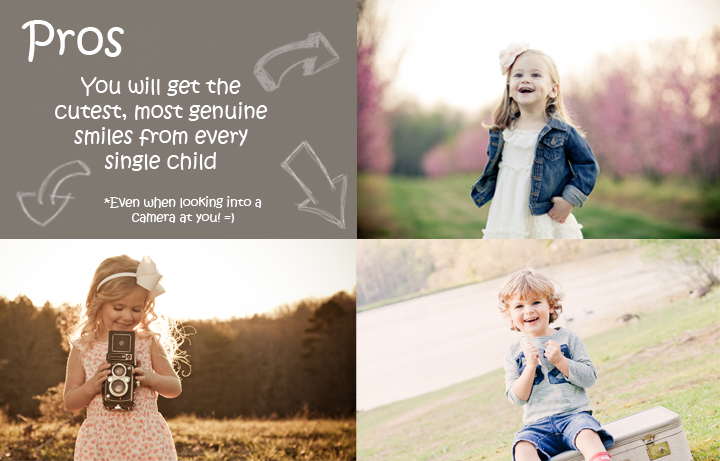
For both shoots pictured I used a stuffed toy in order for it to be seen in the photos. I also used the iPhone on a couple other shoots which greatly caught each child’s attention, but I didn't get the smile the stuffed toy would bring. This could also be due to the fact, that I tend to shoot further away with either a fixed or zoom lens, which ended up being too far away for them to see the screen. This led to squinting or the child would get up to move closer and view it. (See blooper’s below =)
Summary of it all...\Pros: Innovative, portable, easy to attach, sturdy grip, and really does get children's attention and provide a genuine smile!
Cons: It takes over the hot shoe and therefore no wireless trigger, flash, etc. can be mounted. I was however able to use my 7D and after mounting it use the pop up flash to trigger my X1600. (*There is a bracket that will be released shortly that will fix this problem and allow the DaisyGrip to attach to it while still allowing for a wireless trigger). When using it with an iPhone, you have to have a wide lens in order to be close enough for the child to see what is on the screen. And lastly due to the short attention span of children, after about ten minutes or so they are done with the fun and silliness of it and on to the next thing. So my suggestion would be to have a couple backup toys up your sleeve and bring them out once you have everything in position to get the exact smile you want!
Be sure to check out DaisyGrip's website and snatch up one for yourself!
If you have a product you know of and want us to review it, send us an email info@yahrite.com!
Pro’s: Lightweight, convenient, steady, portable, easy to attach, and can be used on any surface. It was so nice to be able to have it handy in my camera bag and be able to pop it out and put it on if I wanted more stability!Con’s: There is white wording on the lens strap (the companies logo), and after a couple times of adjusting it for my different lens’ it started to peel off. Other than that, this thing is awesome! In conclusion, this is a great product, and wonderful to use when a tripod is not an option, like in my scenario, or when you need something fast, portable and easy. I definitely see myself getting the silver one for when I use my zoom lens, and trying out the Cube as I have a battery grip on my camera (I had to take it off in order to use this), and the Cube adapts to support the lens with the battery grip still attached.
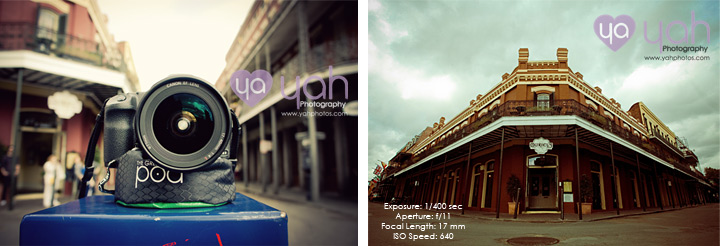
The Story: During our trip to NYC in December I knew that I wanted to get a night shot of the city from the top of a building, and a couple other shots that required a tripod. Once we landed, our first stop was B&H Photo! We went straight to the tripods, found the one we had been looking at online and purchased it. While walking to the register we noticed a display rack for THE pod. My husband had seen it online and had told me about it and we had done a little research on it so we decided to get the green pod and try it out. Well, it was a good thing we did. Later that night, we get to the top of Rockefeller Center and I start to put my tripod up and a security guard tells me that I am not allowed to have a tripod up there. I was so bummed and thought man the rest of the trip is going to stink because I couldn’t use my tripod. But lucky for us, we had grabbed that pod. It made its debut in Grand Central Station, and WOW was it awesome! It is so easy to connect to the camera; you just screw it into the tripod mount and then clip a strap around the lens to keep it in place. Any sort of semi-flat surface will hold the Pod, as it has beans or something similar that stabilizes the camera to hold steady while taking a photograph. I tried out a variety of shutter speed lengths to see just how stable the Pod was, and was impressed by the results. Below are pictures with the camera settings so you can see for yourself...
And here it is on top of the Empire State Building… remember I am 86 stories up and the building sways back and forth; so any sort of zoom lens would show some shake without a tripod, or in my case THE pod =)
Then just this past weekend in New Orleans, I took it everywhere with me and these are the shots I got!
Be sure to check out THE pod on their website, and feel free to pick it up from B&H photo or from one of the other fine retailers where it is sold!